10.2 イメージアイコンの表示(addImageIconを使った表示)
mapray.ImageIconEntityのaddImageIconを使ってイメージアイコンを表示する方法を説明します。
1. サンプルコード
mapray.ImageIconEntityのaddImageIconを使ってイメージアイコンを表示する AddImageIcon.html のサンプルコードです。 このサンプルコードでは、東京タワーにイメージアイコンを表示します。
 1: <!DOCTYPE html>
 2: <html>
 3:     <head>
 4:         <meta charset="UTF-8">
 5:         <title>AddImageIconSample</title>
 6:         <script src="https://resource.mapray.com/mapray-js/v0.9.4/mapray.min.js"></script>
 7:         <link rel="stylesheet" href="https://resource.mapray.com/styles/v1/mapray.css">
 8:         <style>
 9:             html, body {
10:                 height: 100%;
11:                 margin: 0;
12:             }
13:
14:             div#mapray-container {
15:                 display: flex;
16:                 position: relative;
17:                 height: 100%;
18:             }
19:         </style>
20:     </head>
21:
22:     <body>
23:         <div id="mapray-container"></div>
24:     </body>
25: </html>
26:
27: <script>
28:     // Access Tokenを設定
29:     var accessToken = "<your access token here>";
30:
31:     // Viewerを作成する
32:     viewer = new mapray.Viewer(
33:         "mapray-container", {
34:             image_provider: new mapray.StandardImageProvider("https://cyberjapandata.gsi.go.jp/xyz/seamlessphoto/", ".jpg", 256, 2, 18),
35:             dem_provider: new mapray.CloudDemProvider(accessToken)
36:         }
37:     );
38:
39:     // 球面座標系(経度、緯度、高度)で視点を設定。東京タワー付近35.657281, 139.745265
40:     var home_pos = { longitude: 139.745265, latitude: 35.657281, height: 50 };
41:
42:     // 球面座標から地心直交座標へ変換
43:     var home_view_geoPoint = new mapray.GeoPoint( home_pos.longitude, home_pos.latitude, home_pos.height );
44:     var home_view_to_gocs = home_view_geoPoint.getMlocsToGocsMatrix( mapray.GeoMath.createMatrix() );
45:
46:     // 視線方向を定義
47:     var cam_pos = mapray.GeoMath.createVector3([0, -1000, 300]);
48:     var cam_end_pos = mapray.GeoMath.createVector3([0, 0, 0]);
49:     var cam_up = mapray.GeoMath.createVector3([0, 1, 0]);
50:
51:     // ビュー変換行列を作成
52:     var view_to_home = mapray.GeoMath.createMatrix();
53:     mapray.GeoMath.lookat_matrix(cam_pos, cam_end_pos, cam_up, view_to_home);
54:
55:     // カメラの位置と視線方向からカメラの姿勢を変更
56:     var view_to_gocs = viewer.camera.view_to_gocs;
57:     mapray.GeoMath.mul_AA(home_view_to_gocs, view_to_home, view_to_gocs);
58:
59:     // カメラのnear  farの設定
60:     viewer.camera.near = 30;
61:     viewer.camera.far = 500000;
62:
63:     // イメージアイコンのエンティティを作成
64:     var imag_icon_entity = new mapray.ImageIconEntity(viewer.scene);
65:
66:     // 東京タワーの座標を求める
67:     var image_icon_Point = new mapray.GeoPoint(139.745340, 35.658694, 100);
68:
69:     // イメージアイコンを追加
70:     imag_icon_entity.addImageIcon("./image/TokyoTower.jpg", image_icon_Point, { size: [300, 200] });
71:
72:     // エンティティをシーンに追加
73:     viewer.scene.addEntity(imag_icon_entity);
74: </script>
このサンプルコードの詳細を以下で解説します。
1.1. htmlの記述
1~25行目がでhtmlの定義です。ヘルプページ『緯度経度によるカメラ位置の指定』で示したhtmlファイルからタイトルのみを変更します。 詳細はヘルプページ『緯度経度によるカメラ位置の指定』を参照してください。
 1: <!DOCTYPE html>
 2: <html>
 3:     <head>
 4:         <meta charset="UTF-8">
 5:         <title>AddImageIconSample</title>
 6:         <script src="https://resource.mapray.com/mapray-js/v0.9.4/mapray.min.js"></script>
 7:         <link rel="stylesheet" href="https://resource.mapray.com/styles/v1/mapray.css">
 8:         <style>
 9:             html, body {
10:                 height: 100%;
11:                 margin: 0;
12:             }
13:
14:             div#mapray-container {
15:                 display: flex;
16:                 position: relative;
17:                 height: 100%;
18:             }
19:         </style>
20:     </head>
21:
22:     <body>
23:         <div id="mapray-container"></div>
24:     </body>
25: </html>
1.2. カメラ位置・向きの設定
29~61行目でMapray.Viewerクラスを作成し、カメラ位置・向きを設定します。 詳細はヘルプページ『緯度経度によるカメラ位置の指定』を参照してください。
28: // Access Tokenを設定
29: var accessToken = "<your access token here>";
30:
31: // Viewerを作成する
32: viewer = new mapray.Viewer(
33:     "mapray-container", {
34:         image_provider: new mapray.StandardImageProvider("https://cyberjapandata.gsi.go.jp/xyz/seamlessphoto/", ".jpg", 256, 2, 18),
35:         dem_provider: new mapray.CloudDemProvider(accessToken)
36:     }
37: );
38:
39: // 球面座標系(経度、緯度、高度)で視点を設定。東京タワー付近35.657281, 139.745265
40: var home_pos = { longitude: 139.745265, latitude: 35.657281, height: 50 };
41:
42: // 球面座標から地心直交座標へ変換
43: var home_view_geoPoint = new mapray.GeoPoint( home_pos.longitude, home_pos.latitude, home_pos.height );
44: var home_view_to_gocs = home_view_geoPoint.getMlocsToGocsMatrix( mapray.GeoMath.createMatrix() );
45:
46: // 視線方向を定義
47: var cam_pos = mapray.GeoMath.createVector3([0, -1000, 300]);
48: var cam_end_pos = mapray.GeoMath.createVector3([0, 0, 0]);
49: var cam_up = mapray.GeoMath.createVector3([0, 1, 0]);
50:
51: // ビュー変換行列を作成
52: var view_to_home = mapray.GeoMath.createMatrix();
53: mapray.GeoMath.lookat_matrix(cam_pos, cam_end_pos, cam_up, view_to_home);
54:
55: // カメラの位置と視線方向からカメラの姿勢を変更
56: var view_to_gocs = viewer.camera.view_to_gocs;
57: mapray.GeoMath.mul_AA(home_view_to_gocs, view_to_home, view_to_gocs);
58:
59: // カメラのnear、farの設定
60: viewer.camera.near = 30;
61: viewer.camera.far = 500000;
1.3. ImageIconEntityの生成
イメージアイコンを表示するためには、イメージアイコンの情報を管理するクラス(ImageIconEntity)が必要です。そのため、64行目でImageIconEntityのインスタンスを生成します。コンストラクタの引数には、作成したMapray.Viewerのシーン(Mapray.Viewer.scene)を指定します。
63: // イメージアイコンのエンティティを作成
64: var imag_icon_entity = new mapray.ImageIconEntity(viewer.scene);
1.4. イメージアイコンの生成
67~70行目で、イメージアイコンを生成します。67行目で東京タワーの経度・緯度・高度からGeoPointクラスを定義し、70行目のaddImageIcon関数でピンを作成します。addImageIcon関数には、表示する画像のURL、ピンを表示する位置、生成オプションとしてアイコンの大きさ(縦、横)を、それぞれ設定します。
66: // 東京タワーの座標を求める
67: var image_icon_Point = new mapray.GeoPoint(139.745340, 35.658694, 100);
68:
69: // イメージアイコンを追加
70: imag_icon_entity.addImageIcon("./image/TokyoTower.jpg", image_icon_Point, { size: [300, 200] });
1.5. ImageIconEntityの追加
73行目でImageIconEntityを作成したmapray.Viewerのシーンに追加します。mapray.Viewerのシーンに追加することでイメージアイコンが表示されます。
72: // エンティティをシーンに追加
73: viewer.scene.addEntity(imag_icon_entity);
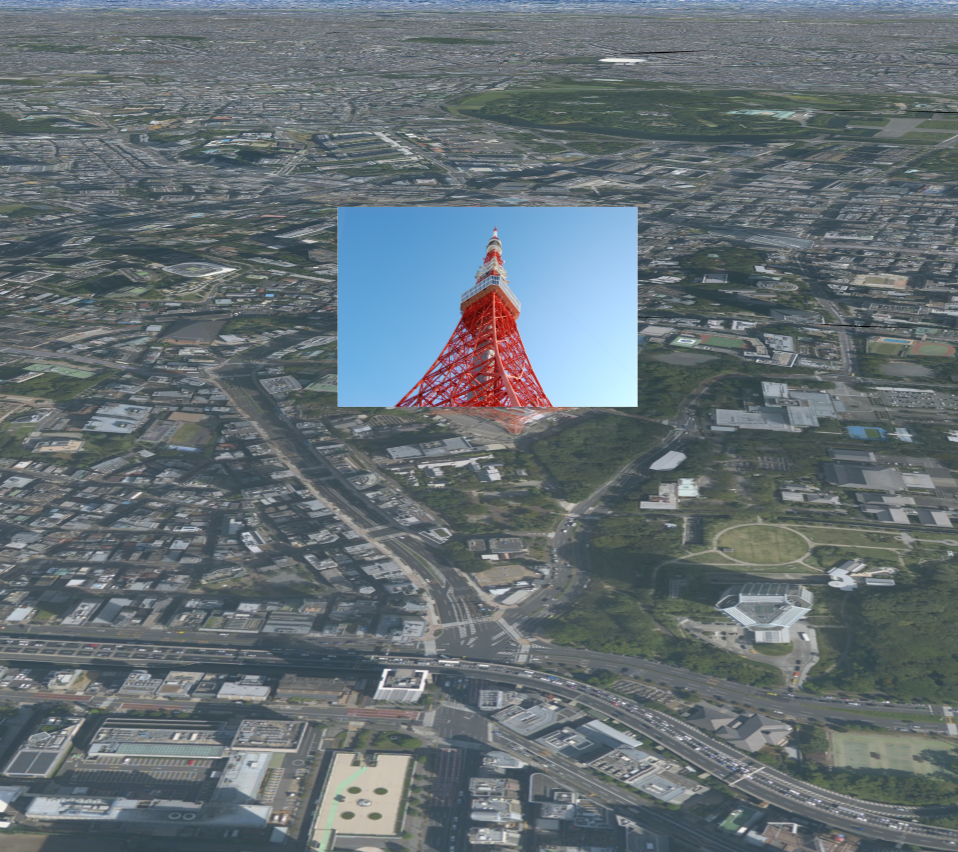
2. 出力イメージ
このサンプルコードの出力イメージは下図のようになります。